屏幕后处理
参考:
入门精要
Games101系列课程
上采样(UnSampling)
和 下采样(DownSampling)是啥? - 知乎 (zhihu.com) URP下用RenderFeature实现高斯模糊
- 知乎 (zhihu.com) 多种模糊算法Unity中的模糊效果(基于URP)
- 知乎 (zhihu.com)
百人计划学习 图形
4.1 Bloom算法 游戏中的辉光效果实现 - 知乎 (zhihu.com) URP
bloom(基于双重方框模糊) - 知乎 (zhihu.com) unity
ShaderLab 基础之【像素混合Blend】Blend命令详解 shaderLab blend
blendOp透明度颜色混合_blend公式和效果-CSDN博客
顾名思义,在屏幕渲染完成后,制作特效等使得整体画面进一步提升艺术感。
onRenderImage属于抓取屏幕的函数,应用在所有透明和不透明渲染完成后(URP弃用)
PostEffectsBase.cs用于检验shader和material,并且通过脚本面板更改数据;如果不符合要求,则脚本失效.
1 2 3 4 5 6 7 8 9 10 11 12 13 14 15 16 17 18 19 20 21 22 23 24 25 26 27 28 29 30 31 32 33 34 35 36 37 38 39 40 41 42 43 44 45 46 47 48 49 50 51 52 53 54 55 56 57 58 59 60 61 62 63 64 65 66 67 68 69 using System;using System.Collections;using System.Collections.Generic;using UnityEngine;[ExecuteInEditMode ] [RequireComponent(typeof(Camera)) ] public class PostEffectsBase : MonoBehaviour { protected void CheckResource () { bool isSupported = CheckSupport(); if (isSupported) { NotSupported(); } } protected bool CheckSupport () { if (SystemInfo.supportsImageEffects == false || SystemInfo.supportsRenderTextures == false ) { Debug.Log("This platform does not support image effects or render texture...." ); return false ; } return true ; } protected void NotSupported () { enabled = false ; } protected void Start () { CheckResource(); } protected Material CheckShaderAndCreateMaterial (Shader shader, Material material ) { if (shader == null ) return null ; if (shader.isSupported && material && material.shader == shader) { return material; } if (!shader.isSupported) { return null ; } else { material = new Material(shader); material.hideFlags = HideFlags.DontSave; if (material) return material; else return null ; } } }
1. 调整屏幕亮度、饱和度、对比度
代码
1
2
3
4
5
6
7
8
9
10
11
12
13
14
15
16
17
18
19
fixed4 frag (v2f i) : SV_Target { // sample the texture fixed4 renderTex = tex2D(_MainTex, i.uv); //Apply Brightness fixed3 finalColor = renderTex.rgb * _Brightness; //Apply Saturation fixed luminance= 0.2125 * renderTex.r + 0 . 7154 * renderTex . g + 0.0721 * renderTex.b; fixed3 luminanceColor = fixed3(luminance,luminance,luminance); finalColor = lerp(luminanceColor,finalColor,_Saturation); //饱和度是色彩的鲜艳程度或纯度 //Apply Contrast fixed3 avgColor = fixed3(0.5,0.5,0.5); finalColor = lerp(avgColor,finalColor,_Contrast); return fixed4(finalColor,renderTex.a); }
1.直接相乘得到亮度
2.计算亮度值luminance;
3.使用饱和度在上一步颜色和亮度值之间插值
4.对比度类似。
2. 边缘检测
利用边缘检测算子对图像进行卷积
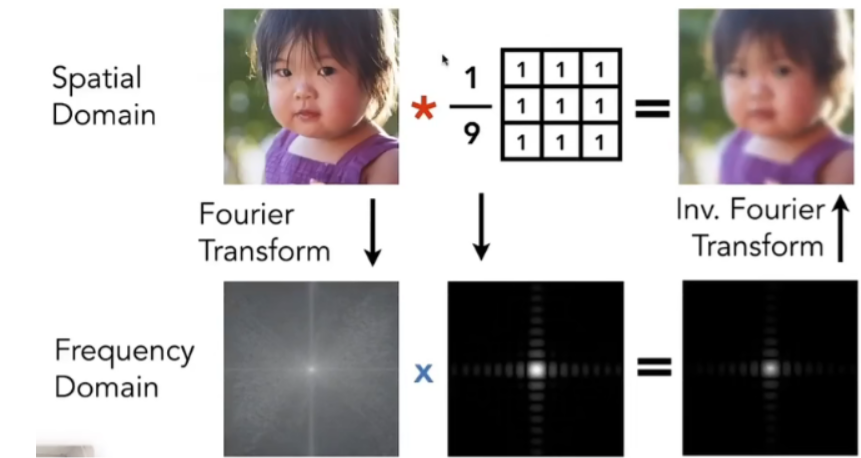
2.1 什么是卷积
如果我们想要对图像进行均值模糊,可以使用一个 3x3
的卷积核,核内每个元素的值均为 1/9。
简单来说就是用卷积核遍历所有屏幕上像素,求得的加权均值为卷积结果。
在进行边缘检测时,我们需要对每个像素进行卷积计算,有两个方向的梯度。
整体梯度公式为 \[
G = sqrt(Gx^2 + Gy^2)
\] 出于性能考虑,一般也用绝对值取代开根号。
使用Sobel算子实现描边
顶点着色器
1
2
3
4
5
6
7
8
9
10
11
12
13
14
15
16
17
v2f vert (appdata_img v) { v2f o; o.vertex = UnityObjectToClipPos(v.vertex); half2 uv = v.uv; o.uv[0] = uv + _MainTex_TexelSize.xy * half2(-1, -1); o.uv[1] = uv + _MainTex_TexelSize.xy * half2(0, -1); o.uv[2] = uv + _MainTex_TexelSize.xy * half2(1, -1); o.uv[3] = uv + _MainTex_TexelSize.xy * half2(-1, 0); o.uv[4] = uv + _MainTex_TexelSize.xy * half2(0, 0); o.uv[5] = uv + _MainTex_TexelSize.xy * half2(1, 0); o.uv[6] = uv + _MainTex_TexelSize.xy * half2(-1, 1); o.uv[7] = uv + _MainTex_TexelSize.xy * half2(0, 1); o.uv[8] = uv + _MainTex_TexelSize.xy * half2(1, 1); return o; }
使用Sobel算子采样,并且将采样代码转到顶点着色器,减少运算。并且由于顶点到片元的插值是线性的,所以并不会影响结果。
edge计算
计算9块像素的亮度,并且将水平和竖直方向的对应梯度和计算出来。最后1减去两者绝对值。
得到的edge越小,越有可能是边缘
1
2
3
4
5
6
7
8
9
10
11
12
13
14
15
16
17
18
19
20
half Sobel(v2f i) { const half Gx[9] = {-1, 0, 1, -2, 0, 2, -1, 0, 1}; const half Gy[9] = {-1, -2, -1, 0, 0, 0, 1, 2, 1}; half texColor; half edgeX = 0; half edgeY = 0; for (int it = 0; it < 9; it++) { texColor = luminance(tex2D(_MainTex, i.uv[it])); edgeX += texColor * Gx[it]; edgeY += texColor * Gy[it]; } half edge = 1 - abs(edgeX) - abs(edgeY); return edge; }
片元着色器
利用Sobel得到梯度值edge后,分别计算贴图和纯色背景下的颜色值。
最后利用_EdgeOnly在两者之间取值。
1
2
3
4
5
6
7
fixed4 fragSobel(v2f i) : SV_Target { half edge = Sobel(i); fixed4 withEdgeColor = lerp(_EdgeColor, tex2D(_MainTex, i.uv[4]), edge); fixed4 onlyEdgeColor = lerp(_EdgeColor, _BackgroundColor, edge); return lerp(withEdgeColor, onlyEdgeColor, _EdgeOnly); }
3. 高斯模糊
Built-in版本见入门精要,这里主要使用URP
3.1 基本原理
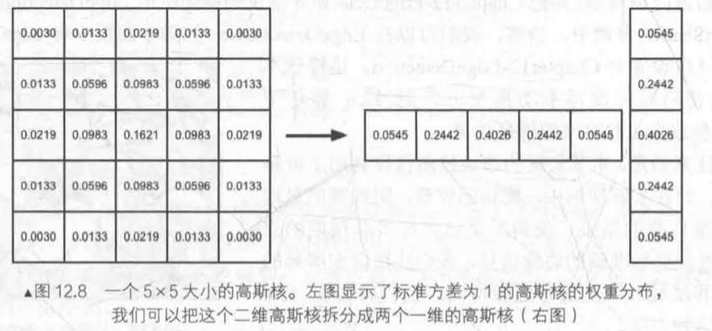
卷积的另一个应用是高斯模糊,高斯模糊是使用高斯函数的模糊方法,进而所使用的卷积核也叫做高斯核。
高斯核是正方形的滤波核。
以下是高斯函数 ,一般标准方差σ为1
\(G(x,y)=\frac{1}{2πσ^2}e^{-\frac{x^2+y^2}{2σ^2}}\)
高斯函数很好地模拟了像素处理时,邻域像素之间的影响关系,越近影响越大。
设高斯核为NxN,屏幕为WxH
可知时间复杂度为O(NxNxWxH),一旦增加高斯核维度,采样次数会大幅增加。
优化方式 是使用两个一维高斯核进行替代,时间复杂度为O(NxWxH)
这里使用两个Pass,先使用竖直方向的高斯核进行滤波,而后是水平方向。
核心代码
1
2
3
4
5
6
7
8
9
10
11
12
13
14
15
16
17
18
19
20
21
22
23
24
25
26
27
28
29
30
31
32
33
34
35
36
37
38
39
40
41
42
43
44
45
46
47
48
49
50
51
52
53
54
55
56
57
58
59
60
61
62
63
64
65
struct Attributes { float4 positionOS : POSITION; float2 uv : TEXCOORD0; }; struct Varyings { float2 uv[5 ] : TEXCOORD0; float4 positionCS : SV_POSITION; }; float _BlurSize;sampler2D _MainTex;float4 _MainTex_TexelSize; Varyings VertBlurVertical(Attributes v) { Varyings o; o.positionCS = TransformObjectToHClip(v.positionOS.xyz); float2 uv = v.uv; o.uv[0 ] = uv; o.uv[1 ] = uv + float2(0.0 , _MainTex_TexelSize.y * 1.0 ) * _BlurSize; o.uv[2 ] = uv - float2(0.0 , _MainTex_TexelSize.y * 1.0 ) * _BlurSize; o.uv[3 ] = uv + float2(0.0 , _MainTex_TexelSize.y * 2.0 ) * _BlurSize; o.uv[4 ] = uv - float2(0.0 , _MainTex_TexelSize.y * 2.0 ) * _BlurSize; return o; } Varyings VertBlurHorizontal(Attributes v) { Varyings o = (Varyings)0 ; o.positionCS = TransformObjectToHClip(v.positionOS.xyz); float2 uv = v.uv; o.uv[0 ] = uv; o.uv[1 ] = uv + float2(_MainTex_TexelSize.x * 1.0 , 0.0 ) * _BlurSize; o.uv[2 ] = uv - float2(_MainTex_TexelSize.x * 1.0 , 0.0 ) * _BlurSize; o.uv[3 ] = uv + float2(_MainTex_TexelSize.x * 2.0 , 0.0 ) * _BlurSize; o.uv[4 ] = uv - float2(_MainTex_TexelSize.x * 2.0 , 0.0 ) * _BlurSize; return o; } float4 fragBlur(Varyings i) : SV_Target { float weight[3 ] = {0.4026 , 0.2442 , 0.0545 }; float3 sum = tex2D(_MainTex, i.uv[0 ]).rgb * weight[0 ]; for (int it = 1 ; it < 3 ; it++) { sum += tex2D(_MainTex, i.uv[it * 2 - 1 ]).rgb * weight[it]; sum += tex2D(_MainTex, i.uv[it * 2 ]).rgb * weight[it]; } return float4(sum, 1.0 ); }
RenderFeature核心代码
1
2
3
4
5
6
7
8
9
10
11
12
13
14
15
16
17
18
19
20
21
22
23
24
25
26
27
28
29
30
31
32
33
34
35
36
void Render (CommandBuffer cmd, ref RenderingData renderingData ){ var source = currentTarget; int destination0 = TempTargetId0; int destination1 = TempTargetId1; ref var cameraData = ref renderingData.cameraData; var data = renderingData.cameraData.cameraTargetDescriptor; var width = data.width/ parameter.downSample.value ; var height = data.height / parameter.downSample.value ; cmd.GetTemporaryRT(destination0, width, height, 0 , FilterMode.Trilinear, RenderTextureFormat.ARGB32); cmd.Blit(source, destination0); for (int i = 0 ; i < parameter.iterations.value ; ++i) { cmd.SetGlobalFloat("_BlurSize" , 1.0f + i * parameter.blurSpread.value ); cmd.GetTemporaryRT(destination1, width, height, 0 , FilterMode.Bilinear, RenderTextureFormat.ARGB32); cmd.Blit(destination0, destination1, postMaterial, 0 ); cmd.ReleaseTemporaryRT(destination0); cmd.GetTemporaryRT(destination0, width, height, 0 , FilterMode.Bilinear, RenderTextureFormat.Default); cmd.Blit(destination1, destination0, postMaterial, 1 ); cmd.ReleaseTemporaryRT(destination1); } cmd.Blit(destination0, source); cmd.ReleaseTemporaryRT(TempTargetId0); }
3.2 上采样和下采样
下采样
缩小图像 (或称为下采样(subsampled) 或降采样(downsampled) )的主要目的有两个:
使得图像符合显示区域的大小;
生成对应图像的缩略图。
上采样:
放大图像 (或称为上采样(upsampling) 或图像插值(interpolating) )的主要目的是:放大原图像,从而可以显示在更高分辨率的显示设备上。
4. Bloom效果
根据某个阈值提取出画面中较亮的区域,然后通过高斯模糊,模拟光线扩散的结果。
HDR与LDR(Low dynamic range)
高动态范围和低动态范围
其中LDR: jpg,png图片,rgb范围在【0,1】之间
而HDR:
hdr,exr图片,rgb范围可以在【0,1】之外,更真实地反应光照效果
以下Bloom效果是在URP下的实现
Bloom算法 ,辉光效果算法,模拟摄像机图像效果,让物体有真实的明亮效果
提取较亮的部分
1
2
3
4
5
6
7
8
9
10
11
12
13
14
15
16
17
v2f vertExtractBright(app2v v) { v2f o; o.pos = TransformObjectToHClip(v.vertex); o.uv = v.texcoord; return o; } float luminance(float4 color) { return 0.2125 * color.r + 0.7154 * color.g + 0.0721 * color.b; } float4 fragExtractBright(v2f i) : SV_Target { float4 c = SAMPLE_TEXTURE2D(_MainTex,sampler_MainTex,i.uv); float val = clamp (luminance(c) - _LuminanceThreshold, 0.0 , 1.0 ); return c * val; }
模糊该部分(高斯模糊)
见上文
与原图混合
1
2
3
4
5
6
7
8
9
10
11
12
13
14
15
16
17
18
19
v2fBloom vertBloom(app2v v) { v2fBloom o; o.pos = TransformObjectToHClip(v.vertex); o.uv.xy = v.texcoord; o.uv.zw = v.texcoord; #if UNITY_UV_STAR_AT_TOP if (_MainTex_TexelSize.y TS< 0.0 ) o.uv.w = 1.0 - o.uv.w; #endif return o; } float4 fragBloom(v2fBloom i) : SV_Target { return SAMPLE_TEXTURE2D(_MainTex,sampler_MainTex,i.uv.xy) + SAMPLE_TEXTURE2D(_Bloom,sampler_Bloom,i.uv.zw); }
RenderFeature代码
1
2
3
4
5
6
7
8
9
10
11
12
13
14
15
16
17
18
19
20
21
22
23
24
25
26
27
28
29
30
31
32
33
34
35
36
37
38
void Render (CommandBuffer cmd, ref RenderingData renderingData ){ var source = currentTarget; int destination0 = TempTargetId0; int destination1 = TempTargetId1; ref var cameraData = ref renderingData.cameraData; var data = renderingData.cameraData.cameraTargetDescriptor; var width = data.width/ parameter.downSample.value ; var height = data.height / parameter.downSample.value ; cmd.GetTemporaryRT(destination0, width, height, 0 , FilterMode.Trilinear, RenderTextureFormat.ARGB32); cmd.Blit(source, destination0); for (int i = 0 ; i < parameter.iterations.value ; ++i) { cmd.SetGlobalFloat("_BlurSize" , 1.0f + i * parameter.blurSpread.value ); cmd.GetTemporaryRT(destination1, width, height, 0 , FilterMode.Bilinear, RenderTextureFormat.ARGB32); cmd.Blit(destination0, destination1, postMaterial, 0 ); cmd.ReleaseTemporaryRT(destination0); cmd.GetTemporaryRT(destination0, width, height, 0 , FilterMode.Bilinear, RenderTextureFormat.Default); cmd.Blit(destination1, destination0, postMaterial, 1 ); cmd.ReleaseTemporaryRT(destination1); } cmd.Blit(destination0, source); cmd.ReleaseTemporaryRT(TempTargetId0); }


